how to draw 3d bullet holes
How to create 3D bullet holes in 5 simple steps
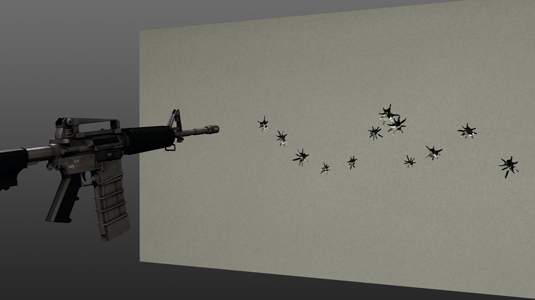
Impact craters, which appear to gouge deep chunks out of your BG surface, can easily be created in Maya with particle-instanced geo, a double-sided shader to create strategically rendered alpha, and a Compositing application, such as Nuke.
- Download the source files for this tutorial hither
01. Instance crater geometry
Setting upwards the double-sided shader in Maya is easy. Apply a material to the geometry that is going to be instanced. If you render now, and bank check the blastoff, you'll see that the alpha represents the unabridged silhouette of your geometry.
What you want is for the alpha to only be present where you want to see the crater geo, so essentially the front, rather than the back, of the rendered geo. In the instance of alpha, which simply covers the areas of the craters that you want to see, you can comp your crater return onto your BG, and create the illusion that the craters have actually been carved out of the BG.
02. Creating a Status node
Adjacent, create a Condition node, brand sure that the Operation is set to Equal, and connect the outColor (red) to the Matte Opacity of your material. The Condition node will output the colour you specify, based on any status you lot set. In this example, nosotros want the status to be adamant past whether the pixel currently existence rendered displays the front, or back, of the geo being rendered. If the pixel shows the front of the geo, we want the condition node to output white.
If the pixel shows the back, we want the Status node to output black. To observe out which side of the geo is existence rendered, for each pixel, connect the Flipped Normal output from a Sampler Info node to the Starting time Term of the Condition node. Set the Color If True (red) to one.0, and the Color If False (red) to 0. Render and compare the RGB and alpha channels. The RBG will show all of your geo, but the alpha should simply encompass the pixels that represent the front of the geo.
03. Bullet impacts
Once the shader is ready on your crater geo, you lot are ready to set upwardly the bullet impacts with a combination of Particle Collision events, and Particle Instancing. Turn your BG surface into an nMesh Passive Collider, setting its Standoff Thickness to 0.0. Run the simulation to confirm that your particles collide with the surface.
Create a Particle Collision Event to emit a new particle (named nParticle_crater), and kill the original particle when it collides with your surface. Equally y'all run the simulation you should run across new particles announced where the original particle collided with the surface and died. To create a particle instance node select your crater geo, running nParticles -> Instancer -> Options. Make certain your crater geo is listed as the "Instanced Object" and nParticle_crater is selected as the "Particle object to instance", and then click Create.
Run the simulation. Instanced copies of the crater geo should appear at each crater particle as it is emitted. Since bullet holes tend to be background effects y'all could return your simulation as information technology is. But in close upwards, viewers may notice repetition of the geo.
04. Random simulation
To add together randomness to the simulation you could use multiple pieces of crater geo, each with a slightly unlike look, and randomise the scale and rotation of each instanced crater. To do this, add a custom, per particle, attribute to your particle object, bulldoze that attr's value with an expression, then select that custom attr from the Rotation drop-downwardly menu in the Instancer section of the crater particle'south Attribute Editor.
The simulation can be further refined by calculation additional effects, such as grit or shards ejected from the bear upon, using the same techniques. And so cache your simulation one time y'all're happy with it.
05. Concluding renders
Render your BG surface and crater separately and you lot are ready to cease in Comp. The alpha, built into your rendered crater images makes it easy to comp them over your BG using Nuke, Later Effects, or whatever Compositor you like. I congenital a uncomplicated Comp script in Nuke by creating Read nodes for each element, connecting them to a Merge node (Operation prepare to Matte), and Rendering.
Approaching procedural effects, such every bit bullet affect craters or sparks, with a combined 2nd/3D strategy like this tin can produce powerful results.
Words: William Dwelly
William Dwelly has been working in Visual Effects since the '90s, working on such films every bit Avatar and I, Robot. He has also written two books on Maya.
This article originally appeared in 3D World issue 174.
Liked this? Read these!
- The best 3D movies of 2014
- Detect what'southward next for Augmented Reality
- Download gratuitous textures: loftier resolution and set up to use now
Related articles
colsontheyeasion1997.blogspot.com
Source: https://www.creativebloq.com/3d-world/how-create-3d-bullet-holes-5-simple-steps-11410470
0 Response to "how to draw 3d bullet holes"
Postar um comentário